E1 | Bath Accessibility, Wooden Gutter | Ask This Old House
Season 23 Episode 1 | 23m 42sVideo has Closed Captions
Richard and Nathan make a bathroom more accessible; Tom and Nathan replace wooden gutters.
Richard and Nathan assist a homeowner with a couple upgrades to make her bathroom better suited for aging in place; After being denied by gutter companies and local handymen, a homeowners last hope is to call Tom and Nathan to help replace her rotten wooden gutters.
Problems playing video? | Closed Captioning Feedback
Problems playing video? | Closed Captioning Feedback
Funding for THIS OLD HOUSE is provided by The Home Depot and Renewal By Andersen.
Support provided by:

E1 | Bath Accessibility, Wooden Gutter | Ask This Old House
Season 23 Episode 1 | 23m 42sVideo has Closed Captions
Richard and Nathan assist a homeowner with a couple upgrades to make her bathroom better suited for aging in place; After being denied by gutter companies and local handymen, a homeowners last hope is to call Tom and Nathan to help replace her rotten wooden gutters.
Problems playing video? | Closed Captioning Feedback
How to Watch Ask This Old House
Ask This Old House is available to stream on pbs.org and the free PBS App, available on iPhone, Apple TV, Android TV, Android smartphones, Amazon Fire TV, Amazon Fire Tablet, Roku, Samsung Smart TV, and Vizio.
Keep Exploring


This Old House Insider Newsletter
Get This Old House exclusive stories, tips, and behind-the-scenes information delivered right to your inbox every month.Providing Support for PBS.org
Learn Moreabout PBS online sponsorship♪♪ Kevin: On "Ask This Old House," our experts travel across the country to answer questions about your house.
♪♪ Today, Nathan is in high demand.
Richard needs him on a project updating a bathroom for a woman who wants to age in place.
Margaret: I grew up here.
My son grew up here.
I would like to stay here as long as possible.
Richard: Let's see what we can do the help.
Nathan: Yeah.
Margaret: Great.
Thank you.
Kevin: And Tom needs Nathan's help to replace a wooden gutter.
That's all coming up next on "Ask This Old House."
♪♪ Kevin: Hey, there.
Welcome back to a brand-new season of "Ask This Old House."
We got a great one for you this year.
Lots of projects throughout the season, and a bunch going on today.
I like to see that the workshop is abuzz.
Richard, Nathan, how you guys doing?
Nathan: Good.
Richard: Good.
Kevin: You guys going out on a project together?
Richard: Yeah, we got an email about a project about aging in place, and we thought we'd go together and help her out.
Kevin: Perfect.
Just the man, I know.
But -- S-Silva's here somewhere.
Hey, Tommy.
How are you?
Tom: Hey, I'm good.
Kevin: What are you working on?
Tom: I'm looking for him.
Nathan: Uh-oh.
Richard: When?
Tom: I need you to give me a hand on a project.
It's a pretty good size, so... Kevin: I can give you a hand.
Tom: Well, I really need him.
Kevin: Oh.
You want me to give you -- I'll give you a hand.
Richard: No.
We're good.
Nathan: I'll help Richard first, then I'll come to you, Tommy.
Tom: Alright.
Kevin: You got both of them?
Nathan: I got it.
Kevin: I'll -- I'll fill in.
Nathan: I got it.
Kevin: You sure?
Nathan: I got it.
Kevin: Okay.
That's -- No, you know what?
That's alright.
I'll stay here.
I'll just hold down the fort.
Manage the workshop and stuff.
Unless you guys need me.
Tom: Nope.
We're all set.
♪♪ [ Chickens clucking ] Richard: Margaret!
Hello, there.
Margaret: Hello!
Richard: How are you?
Nathan and Richard are here to get a few eggs.
Margaret: Well, hello.
Oh, farm fresh.
Richard: So, you got three chickens in there.
And they all have names and everything?
Margaret: Yeah, there's Buffy, Red, and Lady Rock.
Richard: I can tell that must be Red.
The red one.
Which one's Buffy?
Margaret: The light-colored one.
Richard: You get eggs out of it?
Margaret: I'm getting about an egg a day at this time of year.
Nathan: Oh, that's great.
So, they have a beautiful home, but you also have a beautiful home.
Margaret: Yes.
Thank you.
Nathan: What year is your house?
Margaret: It was built in 1890.
Nathan: Well, it's immaculately kept.
It's beautiful.
Margaret: Thank you.
Richard: Did you grow up here?
Margaret: I grew up here.
My son grew up here.
Richard: So, you sent us an email that you actually want to stay even longer here.
Margaret: I would like to stay here as long as possible Richard: Let's see what we can do to help.
Nathan: Yeah.
Margaret: Great.
Thank you.
Richard: So, did you ever contemplate leaving here?
Margaret: Yes.
Several years ago, I was going to sell the property.
And I said to the realtor, "Don't bring anybody who's telling me what's wrong with the house, because I know what's wrong."
Richard: It's an old house.
Margaret: That's right.
Richard: But the driveway comes up right here, so you can get a car up here.
Nathan: Come around.
Smooth transition in.
Margaret: Yes, exactly.
No steps, no stairs.
Nathan: Not bad.
Nathan: Oh, this is beautiful.
Margaret: Oh, thank you.
Richard: Look at this.
Beautiful.
Margaret: Thank you.
Nathan: So, what have you done over the years?
What renovations?
Margaret: So, I renovated this kitchen about 20 years ago.
Because when I was growing up, the refrigerator was over there, the stove was there, the sink, a laundry, a toilet around the corner.
Nathan: Mm-hmm.
Richard: Combination kitchen, laundry, bathroom.
All in one.
Margaret: Exactly, exactly.
Richard: You did great.
What's this piece now?
Margaret: Yes, this was original to the house and I wanted to save it.
It's functional.
It looks pretty.
Richard: That's great.
Alright, so you're perfect in the kitchen, but you're going to end up staying on one level.
Living on one level, right?
Margaret: That's the plan.
And my bedroom is through there and the bathroom is through here.
Nathan: Bathroom.
I'm glad you said bathroom, because I actually brought grab bars.
Margaret: Excellent.
Nathan: And I think that's a necessity for aging in place.
We want to put them on the walls, prevent falls.
There's a lot of transitions that happen here.
I grab bar up here would be really helpful and keep you safe.
Margaret: Perfect.
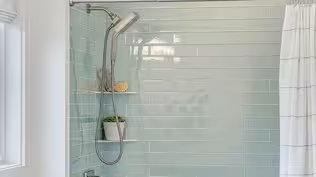
Richard: I see you've got a conventional cast-iron tub here that will stay.
Means the shower head is pretty high, so we'll probably add a hand shower to the end of that shower head arm so you can actually use it down lower.
Alright?
Margaret: Perfect.
Richard: Now, I didn't plan ahead, so I'm going to run to the store and grab what we need.
Anything you need, give me a shout.
I'll be back.
Margaret: Thank you.
Nathan: Can I show you what I got?
Margaret: Yeah.
Nathan: Alright.
Margaret, these are the parts and pieces that I picked up for you.
First off, we have a 24-inch grab bar and a 36-inch grab bar.
And we're going to put these on the wall, and I think they're going to give you that stability you need to transition in and out of the shower.
To anchor them, we could find studs, which is great if we can.
If we don't hit a stud, you know, we hit a cavity, for years, a lot of people would use a toggle bolt like this, but it's really soft.
It could rust.
It's not going to hold up as well.
This company sells an anchoring system that works with their bars, and it's really, really nice.
It comes in a bunch of different pieces, but what we're -- essentially what we're going to do is drill a 1 1/4-inch hole.
We're going to insert this piece.
Then we're going to slide this in.
And see how that flips up there?
Margaret: Mm-hmm.
Nathan: And then if you listen, you can hear it actually starts to ratchet as we pull it back.
Now we're starting to create a sandwich that's going to be on either side of the wall.
We're going to introduce this plate here, which again works with their grab bars.
And we're going to take this machine screw and screw that in there.
We're going to sandwich either side.
And then once we have that in place, then we can mount our bars.
What I really like about this system -- ADA-compliant, it has up to 300 pounds of pull weight.
So it's more than what we need.
But I think more important than this is where we put them.
And I have an idea of where I think, but I'd like your opinion.
Margaret: Okay.
Nathan: Alright, so let's talk about placement of these grab bars.
The first thing to talk about is kind of the way that we can hang them.
We can go horizontal, we can go vertical, and we can also go diagonal.
Each one has its own purpose.
So, vertical would be great for transitioning in and out of the tub.
Horizontal I think is really good for stability.
You know if you're taking a shower, plenty of real estate to grab onto.
And then you have diagonal placement like that.
Really good for being able to lower yourself down if you're going to take a tub.
But do you take more tubs or more showers?
Margaret: Oh, showers.
Nathan: Showers.
Perfect.
Alright, well, I think this is a good spot for a vertical one.
Another thing to talk about is the height that we're going to place it at.
The Americans with Disabilities Act has some great guidelines to follow.
Between 33 and 36 inches off the floor or off the base of the tub would be an area for us to aim for.
Margaret: Okay.
Nathan: So if we go over here, between 33 and 36 inches for a grab bar is a great height, especially for horizontal.
You know, if we hang this vertically, we're obviously going to cover that, no problem.
Over here, you know, between that 33 and 36 would be ideal.
But also a lot of it's the comfort level and how you're going to use this shower.
You know, if they told me to put it up 4 feet, if it doesn't work for you, then it's no good.
We need to make it customized to your needs.
So what I'd like you to do is maybe step in and step out.
Let me hop out.
And just show me what you think about vertical height and horizontal height.
So, that's great.
That's definitely going to hit right there.
Margaret: Mm-hmn.
Nathan: And then we'll have that 3-foot bar that we can put horizontally.
We can go second course.
We can go third course.
What do you think?
Margaret: I mean, I've been saying second all along, but now I'm thinking, I wonder if I should have it a little lower.
Nathan: Just a little bit lower?
Margaret: Sure.
Nathan: Easy.
Very easy for us to do.
Aesthetically, we definitely want to center it in the tile.
I'm going to have to drill that 1 1/4-inch hole, so we want that to be in a nice solid piece of tile and not on any joint, so we'll make it work.
I think we get started with the vertical one and then we hop over onto the horizontal one.
Margaret: Sounds good.
Nathan: Alright.
So, the first thing we're going to do is we're going to plumb this.
Then I'm going to trace the outside of this ring.
From there I'm going to bring in this stainless steel plate.
And I'm going to trace the center.
Now that's our center.
So we get ready to drill.
We have a jig with a 1 1/4-inch hole taken out of it, and this is going to help guide our diamond-tipped hole saw bit.
Since we're drilling a large hole, it's going to be very easy for that bit to want to walk as we start it.
So, I have this 1 1/4-inch hole cut out of some PVC with the double-sided tape, and I'm going to center that over there.
And now we can bring our drill bit up, and we'll have a nice clean guide for us to drill out our core.
♪♪ ♪♪ Make sure that's facing up.
It's going to take a little bit of work.
Oh, there it is.
You can hear it click in.
Now we're ready to put this plate on, and you'll see that it has an arrow right here.
And we're running this bar vertically, so I'll make sure those arrows are pointing towards each other.
♪♪ ♪♪ Can we hold it up?
If you just center it over the piece behind.
You check all three of your holes.
Margaret: Looking good.
♪♪ Nathan: Let's try snapping these on.
Like I said, they're a little tough, so just get it where you want it.
♪♪ ♪♪ Richard: Alright, Margaret, short of doing a full remodel, this is a very affordable and simple way to give you that hand shower you're looking for.
All I did was attach it onto the existing base right here.
So you've got a new shower head and then the hand spray.
Let me show you how it works.
[ Water running ] The default will come out to the shower head, and you can select different types of sprays there.
And it has a selector right here on the side.
You can decide between the shower head or the hand shower.
So, you have what you need.
And we hope you don't need any of this stuff for a long time, but you're ready to go if you ever do.
Margaret: Beautiful.
Richard: My hands are wet, but I'll shake your hand anyway.
Margaret: Thank you very much.
Richard: We wish you a long and happy life.
Margaret: [ Laughs ] Thank you.
Richard: Thanks.
Nathan: Nice to meet you, Margaret.
Richard: Great job, Nathan.
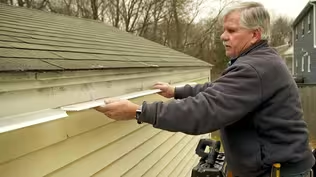
♪♪ ♪♪ Tom: So, we have a homeowner that wrote us about her wooden gutters on her old wooden house, and they were leaking.
So I visited this house about three or four months ago, and the gutters were leaky, but I told her we really can't work on them in the cold weather, so let's see what happens over the winter and we'll see the condition and assess the problem then.
So, that's where we're heading now.
But a lot of people don't realize that when I was younger, along with my brother Dickie and my brother Johnny, we had a gutter machine and we used to roll out gutters and put them on people's houses.
And they were aluminum, so they didn't require any maintenance.
They didn't even have to be painted.
And that's what people liked about it.
Unlike a wooden gutter that requires a lot of maintenance sometimes, and they got to be oiled once a year.
Hi, Regina.
Regina: Hey, Tommy.
How are you?
Tom: I'm good.
It's busy around here in the morning.
A lot of traffic.
Regina: Yes, we have a school across the street.
It's noisy, too.
Tom: Yeah.
[ Laughs ] Well, you wrote me about your gutters.
And this is a beautiful house.
Pretty old, isn't it?
Regina: 1882.
Tom: 1882.
That's about the year of my house.
Actually, I think my house is a little bit older, but not much.
And so, what's the story about the gutters?
Regina: Well, Peter, my husband, had very strong feelings about being a steward of the property, and he wanted to find somebody who would replace the wooden gutter.
And someone came and met with him and wanted to put up an aluminum gutter.
But Peter felt strongly to maintain the authenticity of the house.
And Peter died last year.
Tom: I'm sorry to hear about your loss.
Regina: Thank you.
And so I wanted to honor his quest for somebody to do a wooden gutter.
So I asked everybody that I knew, did they know somebody?
And then I thought, "Well, I'll send an email to 'Ask This Old House.'"
Tom: Yeah.
Regina: And... Tom: Well, here I am.
Regina: ...you showed up!
[ Both laugh ] Tom: Well, I have to say, it's hard to find somebody to do wooden gutters today.
But I love the fact that Peter and you want to keep the house original and keep that old wooden gutter up there.
It's a little bit difficult, a little harder than putting an aluminum one up.
But I've got Nathan and his dad out back, setting the station up so we can see what we have to do with your gutters.
So let's take a walk out back.
Regina: Okay.
Tom: Alright.
So, as you know, I was here about four months ago when I checked the gutter and it looked like it might be repairable, but Nathan's up there now with his dad checking it out.
What do you think, Nathan?
Nathan: Oh, I think it needs a little bit of help.
This repair that they had made years ago is starting to go.
And then the ends are looking a little punky, a little soft, so... Tom: We got to change the whole thing?
Nathan: I think so.
Tom: Alright.
So, we get a little bit of work to do up there.
Regina: You need my help?
Tom: [ Laughs ] No, you can stay down here.
The gutter should be here any moment, and the materials to get started.
But in the meantime, we're going to take some measurements, prep the area, and we'll be in business.
So why don't you go and relax?
Regina: I'll do the heavy looking-on.
Tom: Okay, great.
Thank you.
Alright, so what you have here is a multi-piece fascia board.
There's a small fascia board here that sits under the gutter.
The gutter is wide enough that it goes in and sits on the face of the rafter ends.
So, if I was to draw a little line... ...3/4 inch back right here, that's where the rafters come down all along the house.
And the gutter actually sits on the face of these.
This fascia board is underneath it.
Above the gutter are two pieces of fascia.
So we have the gutter that sits up here, and then two pieces of fascia board over the gutter right here.
So I'm going to place a piece of paper, something I can bend, and I'm just going to trace the profile.
So I can transfer this onto the new gutter.
This is going to give me my outside miter.
Then I want to match the profile coming down here and the profile here with a miter.
So this is my long point.
This is my ogee.
And this is where I die into the corner right here where the fascia and the rake trim meet.
And now I have a straight-edge mark right here that lines up with the face of the gutter here.
And I'll mark it here so I have two points.
Right there.
And once we cut the gutter to this profile, we'll have to fine-tune it in place with a little bit of sanding and rasping.
Now we do the same thing on the other end.
Now I got my piece right across there.
Nice.
Nice fit.
I gotta make sure I push that in, because if I don't push it in and I don't follow that contour, if I have a straight line here, I'm not going to get a true measurement.
Nathan: So, on the back side of this wood gutter, on the rafter tails, there's a heavy nail on each one.
So we're going to find those rafter tails and take each nail out.
♪♪ What I just took out is this big piece of lead.
And what they did is they created a dam in the corner.
And what it does is it prevents the water from going into the end.
It forces it to go back down and into the downspout.
Tom: Now you can really see how bad that gutter is rotted right there on the end.
Alright.
All of our rotted wood is off.
And now we're ready to start putting things back together We've got about four rafter tails -- That's the end of the rafters that the fascia board mounts to.
Four of them are a little iffy.
They're not bad enough to cut out, but we do want to sister a piece beside it for good nailing for the gutter and the fascia when we install it.
And the house has what is called a 12 pitch, which means it's 12 inches it goes in, 12 inches goes up.
So I set my square at a 12 pitch, mark the angle of the rafter, and I'm going to make these about 6 1/2 inches long.
And I'm going to cut four of them.
[ Saw whirring ] Okay!
Bill: Okay.
[ Drill whirring ] Tom: Alright, we're getting ready to install the 1x12 fascia board.
This is exterior-grade wood that's primed.
And I'm going to cut it on a 45-degree angle.
I just want to prime that end.
[ Drill whirring ] [ Saw whirring ] To make sure that our joint fits correctly where the intersection from the gable end comes down to the gutter, I've got a template of that transition piece right there.
I'm going to scribe a line.
Make sure it's tight.
Follow it around.
And I'm going to make a rough cut.
Nathan: Alright, we're ready to cut the hole for this 2 1/8-inch drop.
So we have our measurement, 15 1/4 back off our long point.
15 1/4.
And then we're going to split the difference on this 4-inch gutter, so we're going to go 2 inches back.
15 1/4.
[ Drill whirring ] Tom: I want to put a little tar in there first before I slide the gooseneck into it.
♪♪ ♪♪ How you looking, Bill?
Bill: Pretty good now.
Tom: I want to make sure we get plenty in the middle.
Nathan: Yeah.
Tom: Just asking the screws to do a lot there.
[ Drill whirring ] ♪♪ ♪♪ Now, I got a sheet of lead.
High spot here.
Water coming down here will roll right back down into the downspout.
Nathan: We're ready to put our ground underneath.
Some people use a bed molding, but for this one we'll go square.
Tom: Where the gutter meets the fascia board along the top, we sealed that joint with an acrylic caulking.
Finally, to protect the inside of the gutter, we applied a good coat of boiled linseed oil.
Well, this was a big job today, guys.
We got it done.
I didn't think we would, but... Nathan: It turned out great.
Tom: Yeah, it sure did.
Never would have been able to get it done without you.
So thanks for your help.
Bill: Give us a call anytime.
Regina: And I thank you on behalf of my Peter.
He was a good steward of the house, and so you've gave him a wonderful gift.
Thank you so much.
Tom: Thanks, guys.
Nathan: I'll see you guys next time.
Bill: See you soon.
Tom: Alright.
So we've got the gutter all up, new fascia board up.
We repaired the rotted rafters.
You're going to have to get the painter here.
We're going to leave the staging up for him to make it a lot easier.
We've got everything primed that you can't see, would never be able to prime without it.
So that's good.
And then we'll come and take the staging down.
But remember, you have wooden gutters.
They should be oiled at least once a year, and cleaned.
Alright?
Regina: I'll follow your directions.
Tom: Alright.
Regina: Thank you.
Tom: It looks great.
Regina: It looks beautiful.
♪♪ Kevin: Next time on "Ask This Old House"... Mauro shows a homeowner the correct way to repair a wall crack.
Mauro: Okay, press the tape down.
Stretch it out, all the way down.
Kevin: Then we challenge our crew with a game of "What Is It?"
And Richard helps a homeowner update their baseboard covers.
Richard: So, what do you think?
Man: I think this looks great.
Kevin: All that, on "Ask This Old House."


Support for PBS provided by:
Funding for THIS OLD HOUSE is provided by The Home Depot and Renewal By Andersen.